Adding a new finding to a group is almost identical to editing a finding. The only difference is that you must first select the institution and group to which you want to add the findings; when editing a group, you've already made those two selections.
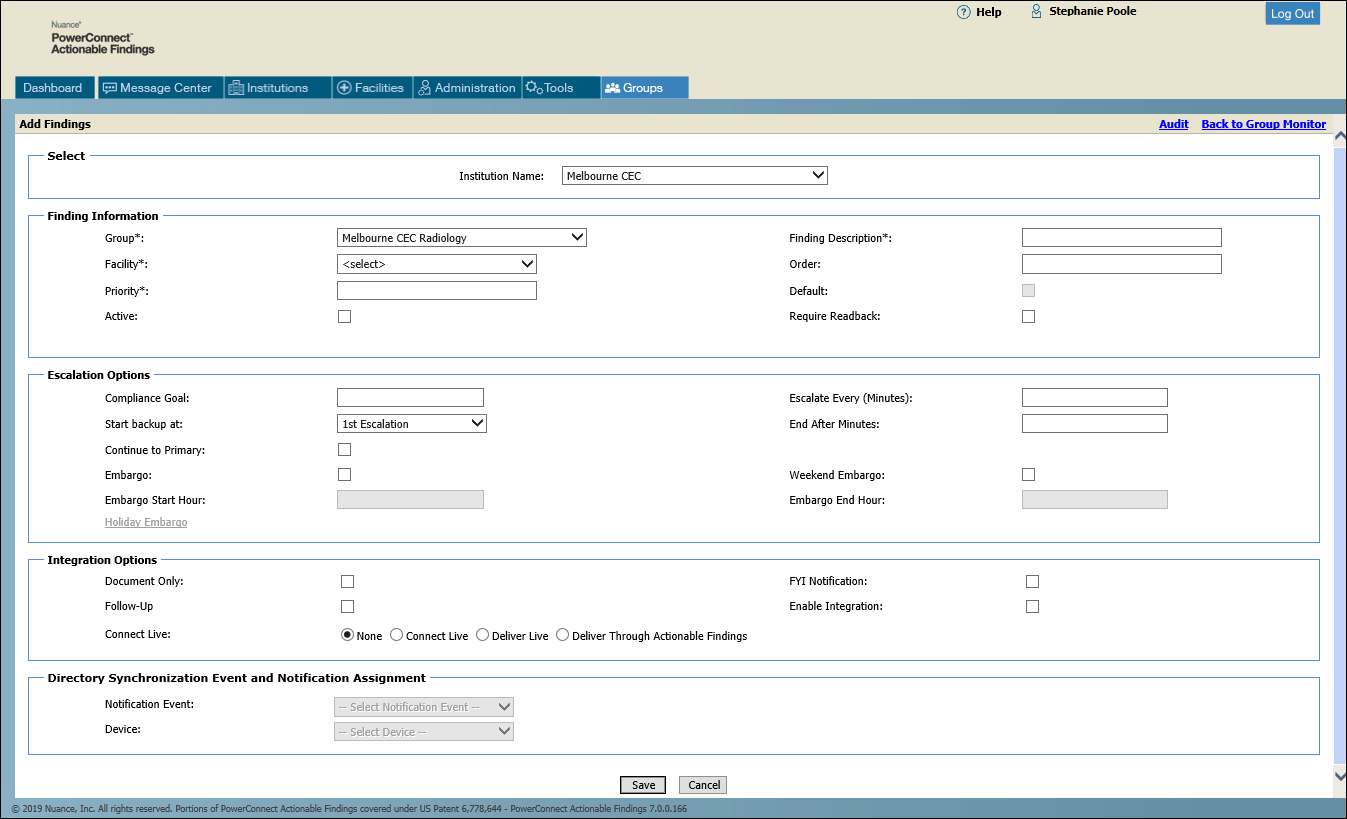
1. Click Groups > Add Findings. The Add Findings window opens.
2. Select the Institution.
3. Select the Group.
NOTE: Field names followed by an asterisk (*) are required. |
Section |
Field |
Description |
Finding Information |
Group* |
Select a group, if more than one group is available. |
Facility* |
Option to select a different facility (if more than one exists) |
|
Priority* |
Determines the finding for a message that contains multiple results. For example, a user might send a lab test that contains two findings: one with a red priority and the other with a yellow priority. If red is a higher priority than yellow, the overall finding for the message will be red. Enter a number (1, 2, and so on) to indicate the priority of this finding. This field accepts a maximum of two digits; no alpha characters are allowed. |
|
Active |
Select this box to make the finding available. You can create several findings and activate/deactivate them as needed. |
|
Finding Description* |
Name of the finding; field can contain up to 50 alpha or numeric characters |
|
Order |
Determines in what order the finding displays in a drop-down list, such as the Finding drop-down in the PowerConnect Actionable Findings application. |
|
Default |
Determines if the finding automatically populates in the Finding drop-down lists (such as in PowerConnect Actionable Findings Desktop), or when forwarding a message from PowerConnect Actionable Findings Web. |
|
Require Readback |
Select to have the system read the Finding Description using text-to-speech. |
|
Escalation Options |
Compliance Goal |
The length of time (in minutes) before the Actionable Findings message is considered out of compliance. |
Start backup at |
Select an escalation level (1st, 2nd, 3rd, or End) to begin sending notifications to the backup contact. |
|
Continue to Primary |
Select this check box to continue sending notifications to the primary contact after the backup contact has begun to receive them. |
|
Embargo |
Select this check box to allow this type of finding to be embargoed, or held, for the specified times. |
|
Embargo Start Hour |
Enter the two-digit hour of the day (with 00 indicating midnight and 23 indicating 11:00 PM) to begin embargoing the Actionable Findings messages. |
|
Escalate Every (Minutes) |
Enter the number of minutes between escalations. |
|
End After (Minutes) |
Enter the number of minutes after which escalation ends. |
|
Weekend Embargo |
Select this check box to apply the embargo hours to weekends as well as weekdays. |
|
Embargo End Hour |
Enter the hour of the day (with 00 indicating midnight and 23 indicating 11:00 PM) to end embargoing the Actionable Findings messages. |
|
Integration Options |
Document Only |
Select this check box if notifications are not to be sent for messages with this finding. |
FYI Notification |
Select this check box to automatically close the message after one notification has been sent to the primary notification device. |
|
Enable Integration |
Select this check box to enable follow-up messages from mPower for customers with a PerfectServe integration. NOTE: This setting applies only to PerfectServe integrations; Epic cannot currently receive follow-up messages. |
|
Connect Live |
Select from the following options for this finding: None – Select this option if no request is to be sent to the agent. Connect Live – Select this option to send a request to the agent to connect to the ordering clinician. Deliver Live – Select this option to send a request to the agent to deliver the message live. Deliver Through Actionable Findings – Select this option to send a request to the agent to deliver the message through the PowerConnect Actionable Findings system. Note: Connect Live is unavailable (grayed out) if the Document Only check box is selected. |
|
Directory Synchronization Event and Notification Assignment |
Notification Event |
Select a notification event (Primary, Backup, Failsafe). (This field is enabled only if the Enable Directory Synchronization option is set to On for the selected facility.) |
Device |
Select a communication device to use for the notification event. (This field is enabled only if the Enable Directory Synchronization option is set to On for the selected facility.) |