In order to use the PowerConnect Actionable Findings web application, users need a user name and password. In order for a user to receive a password, they must provide their email address. The system sends the user an email that requires them to access the system initially and create their password. Once this process is complete, and they have logged in to the system with their user name and password, they are considered provisioned in the system. The Manage Account Provisioning task allows system administrators to view a summary of an institution’s provisioning status.
The system shows users in one of three possible states:
Not Provisioned: The provisioning process has not yet begun
Provisioning In Process: The user has been sent the initial email but has not acted to create their password.
Provisioned: The user has created their password and is now provisioned in the system.
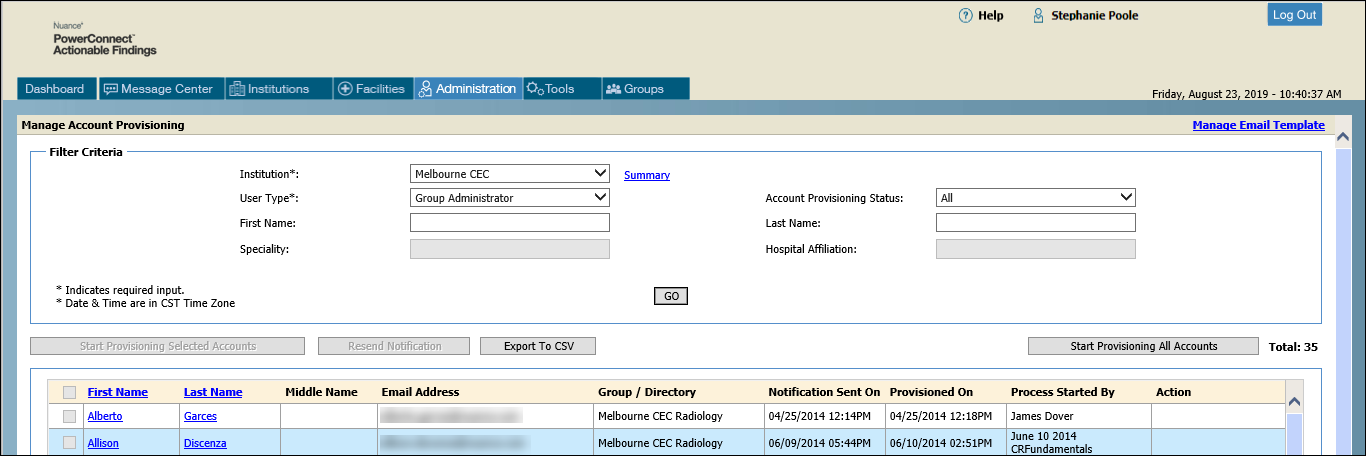
The example illustration below shows the results for the Group Administrator user type with an account provisioning status of All.
1. Click Administration > Manage Account Provisioning.
2. Select an institution from the drop-down list.
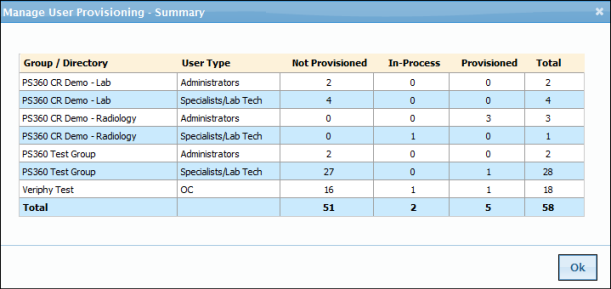
NOTE: After selecting the institution, the Summary link to the right of the institution list allows you to view the provisioning status of all user types in the system. (See illustration below.) Click OK to close the Summary window. |
3. From the User Type drop-down list, select Group Administrator, Specialist, Agent, Agent Admin, Nurse, or Ordering Clinician to filter your results for this institution.
4. Optional: From the Account Provisioning Status drop-down list, select Not Provisioned, Provisioning In Process, Provisioned, or All. By default, All is selected.
5. Optional: If you know the name of a specific user you want to view, enter the first few letters of that person’s first or last name in the text boxes.
6. Click Go to start your search.
7. Use the following table as a guide when reviewing your results in the Manage User Provisioning window.
NOTE: Fields that are self-explanatory, or informational only, are not described in the table below. |
Link or Task |
Description |
Check box at far left |
Allows you to select specific users on whom to perform an action. |
First Name/Last Name links |
Click either link to open a window and edit the user’s profile. |
Notification Sent On |
Date and time that the initial provisioning notification was sent to the user. Populated only for users whose status is Provisioning In Process. |
Completed On |
Date and time that the user completed the provisioning process. Populated only for users whose status is Provisioned. |
Process Started By |
Name of the administrator who started the provisioning process. Populated only for users whose status is Provisioned or Provisioning In Process. |
Action |
Content depends upon the status of the user: For Not Provisioned users: Contains the Start Provision link. Click this link to begin the provisioning process by sending the initial email notification. For Provisioning In Process users: Contains the Resend Notification link. For Provisioned users: This field is blank. |
In the upper-right corner of the window is a link called Manage Email Template. From here, an administrator can customize the OC provisioning emails sent to an OC at a group level. Click here for information on managing the email messaging.