
The Manage Accounts selection appears on the Administration tab. From this window you can add, edit, activate, or deactivate user accounts.
From the Manage Accounts window, select the institution you want to manage. When the results appear, you can fill in one or more of the account filters, and click the Filter button, to help locate the account or accounts you want to manage.
To add a new account: Click the Add Account link in the upper-right corner of the window and enter the user's information in the dialog box that opens.
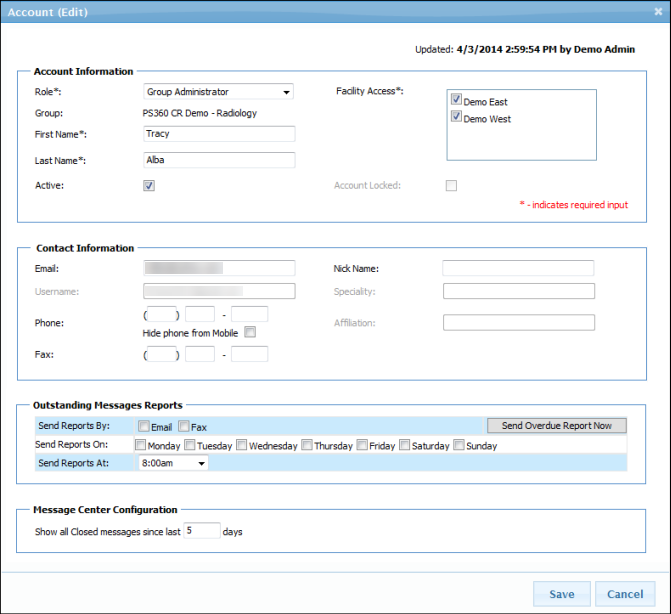
To edit an existing user: Click the Edit link in the list of accounts. Make the necessary changes and click Save when finished.
The windows for adding and editing accounts are nearly identical. The illustration below shows the Edit version, with information already filled in.
Use the following table as a guide when working with the Manage Accounts window.
NOTE: Field names followed by an asterisk (*) are required. Fields that are self-explanatory are not described in the table below. |
Section |
Field |
Description |
||||||||||||||
| Account Information | Role* | Choices for this field vary depending upon the user creating/editing the account:
|
||||||||||||||
| Group | Read-only item. Appears only for Group Administrators and Specialist accounts. Does not appear for Administrator or Coordinator accounts. |
|||||||||||||||
| First Name* | Required. |
|||||||||||||||
| Last Name* | Required. |
|||||||||||||||
| Active | Select this check box to activate the account; clear the check box to deactivate the account. |
|||||||||||||||
Facility Access* |
Select one or more facilities for this account to access. Appears for Group Administrator, Specialist, Lab Group Admin, and Lab Technician accounts. Does not appear for Administrator or Coordinator accounts. |
|||||||||||||||
Account Locked |
Clear this check box to unlock the account. If the account is not currently locked, the check box is unavailable (as shown in the illustration above). |
|||||||||||||||
Contact Information |
Email address for contacting the user. Also becomes the user's initial User Name. |
|||||||||||||||
Username |
Read-only field that can be changed only by the user. By default, this field is the same as the Email field. |
|||||||||||||||
Phone |
Self explanatory |
|||||||||||||||
Fax |
Self explanatory |
|||||||||||||||
Nick Name |
Self explanatory |
|||||||||||||||
Specialty |
Self explanatory |
|||||||||||||||
Affiliation |
Self explanatory |
|||||||||||||||
Outstanding Messages Reports |
Send Report By |
Select Email, Fax, or both. |
||||||||||||||
Send Reports On |
Select one or more days of the week on which to send the reports. |
|||||||||||||||
Send Reports At |
Select a time of day from the drop-down menu. |
|||||||||||||||
Send Overdue Report Now |
Click this button to send a list of overdue reports to this user immediately. |
|||||||||||||||
Message Center Configuration |
Show all Closed messages since last <x> days |
Number of days worth of Closed messages to display. |